Our Minecraft-obsessed kid was turning 11 and really, really wanted a Minecraft-themed party. Too bad there's no Minecraft store or purchase-worthy items on Oriental Trading.
Throwing this party meant that everything (and I do mean everything) had to be DIY. Fortunately, my husband and I are dorks, so we embraced the challenge. I didn't want a bunch of kids sitting around playing Minecraft (as fun as that seems to be), so we decided to create the ultimate scavenger hunt -- to kill the Ender Dragon.
Apparently, there's a lot involved in doing this, so we asked them to whittle down the steps to something manageable, and we built the scavenger hunt around that.
 The food
A quick Pinterest search revealed tons of great food ideas and lots of downloadable templates (some for a fee). In the end, I just created my own so that I could customize the text and images to what I wanted to serve.


Throwing this party meant that everything (and I do mean everything) had to be DIY. Fortunately, my husband and I are dorks, so we embraced the challenge. I didn't want a bunch of kids sitting around playing Minecraft (as fun as that seems to be), so we decided to create the ultimate scavenger hunt -- to kill the Ender Dragon.
Apparently, there's a lot involved in doing this, so we asked them to whittle down the steps to something manageable, and we built the scavenger hunt around that.

A quick Pinterest search revealed tons of great food ideas and lots of downloadable templates (some for a fee). In the end, I just created my own so that I could customize the text and images to what I wanted to serve.


The cake
I came really close to ordering cupcakes from Publix, but I'd committed to doing this, so I decided to go all in. I found this Easy Minecraft Birthday Cake, which turned out to be not so easy. My husband suggested I do a test run, and thank God he did. It did not go well.

However, I was encouraged to try again, and this time my husband suggested a different strategy for the dirt (crushed graham crackers and Oreos, instead of Cocoa Krispies).
He's a genius. It looked authentic and tasted amazing.

Lessons Learned
- Use a large brownie pan - make 3 layers.
- Skim off the top if it's too puffy - you need flat surfaces.
- Use a Wilton Grass tip for the top frosting.
- Use vanilla frosting with gel coloring (not regular food coloring).
- Chill your frosting (in the bags) before squeezing.
- Let your cake completely cool!!!
- Be patient. And drink some wine.
The decorations
This actually kept me up at night, worrying about how I'd pull this off. But I realized that streamers and balloons can go a long way in transforming a space. So, I settled on a few key elements for impact and BOOM. Problem solved.
The tree
I'm not going to lie. The tree was a royal pain in the arse. I stole boxes from strangers' driveways and spent a small fortune printing pixelated paper at Staples. I was so proud of my homemade wrapping paper (that I'd formatted for 11 x 17 paper), until Finn pointed out that I'd printed grass and dirt, not leaves and wood. I told them to suck it up, Buttercup and kept wrapping.
Here are those templates in case anyone else wants to print the wrong thing.
- Grass (used for leaves)
- Dirt (used for tree trunk)
- TNT (side)
- TNT (top)
- Dirt block
- Happy birthday banner

To make the tree: I used a long narrow box for the trunk and stuck a mop handle through the top, resting the left side blocks on it and skewering the bottom right-side block. I used a glue gun to hold the others in place and secured the trunk to the back of the staircase.
The Creeper mask
Using lime, green and black square plates from Party America, I created this masterpiece upside down, duck taping them one by one in place on the back. We used twine across the back to hang on Commander hooks.

Cave spiders and ghosts
We used balloons and streamers to make creepy cave spiders, which we hung in random places throughout the house. And white paper plates became Creeper ghosts with nothing more than a Sharpie and white streamers.


She also wanted a poster of their gamer tag and skin, so I took a screenshot off her laptop and made an enlarged print. I ended up mounting it on a box because I was too cheap to pay the $42 mounting fee.

The craft
What's Minecraft if you don't actually craft something? My husband came through again and built their very own "crafting table" -- a real Minecraft thing -- using leftover drywall and scaffolding. I bought cheap shirts from Michaels for the kids to make Creeper or Enderman shirts and had them draw out of a hat to determine who'd make what. I wasn't about to take a chance on having them all want to make Creepers.
Using the freezer paper method:
- Print your desired pattern on freezer paper
- Cut out the pattern and iron the paper onto the shirt, shiny side down
- Use Tulip Soft Fabric Paint (sold at Michaels or Amazon) to paint over the cut-out
- Wait until they're dry and then peel off the freezer paper


The scavenger hunt
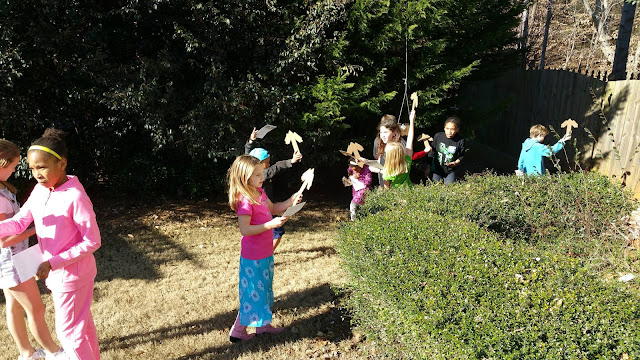
1. Chop down trees to get basic tools.


I found a pickaxe image online and enlarged it as much as I could to print my pattern. And then invested in a good pair of scissors (and a dear friend to help) because cutting through cardboard with my everyday crappy ones nearly gave us arthritis.
2. Get cobblestone to upgrade your tools.
We'd attached each of the clues to cardboard, placing them in each of the designated locations.


3. Find some coal and iron to make torches and iron tools.


The torches took a bit of work. I'd initially found this template and printed a bunch of them on card stock (without doing a test). My flashlight was fat at the top, unlike the version used for the original template. It was also longer. And wider.
After quite a bit of Photoshop work, I modified the original template to fit the flashlights I bought from Dollar Tree. Here's the modified template.
Lesson learned:
- Always, always test! Unless you want a bunch of very expensive scrap paper.
- Keep the top section hollow for the light.
- Draw a dot in Sharpie where the button is before you wrap it. And tape the flashlight to the paper so it doesn't roll around.
- Poke a hole through the card stock for easy access to the on-off button.
- Use good batteries. I used Dollar Tree ones, and a few of them died during the party.

4. Find diamonds and emeralds to upgrade your tools, normally found near lava.

I packaged equal portions of green and clear gems in snack bags and placed them near balled up tissue paper "lava."


I was the villager (arms dealers, whatever) and traded the kids' currency for bow and arrows. I found a great deal on Amazon for bow and arrow party-favors (20 for under $15).

5. Go deep underground to find a dungeon.


6. Go into The Nether and kill Enderman and Blaze.
Apparently you need to kill Enderman (to get Eye of Ender, whatever that is), and use that to fill the holes in the Ender Portal, which teleports you to where the dragon lives. I've learned way more about Minecraft than I ever care to know.


After cutting out Enderman and Blaze images (template here) on heavy card stock, we attached streamers to the back and hung them on a string. We hung some sheets in front of the projector to protect it and turned it on to make it back-lit.

The kids took turns using their weapons.

7. Jump on the Ender Portal.

The Ender Portal has 12 ports that need to be activated. This teleports you to the Ender, where the dragon lives.

Making an Ender Portal sounded easy in theory, but it took longer than I anticipated. I started with a large plastic roll from Home Depot (the consistency of a contractor trash bag), cut out the shape and used painter's tape to block off the margins. I then used green and neon yellow spray paint around the margins.

I was going to have the kids stand on the portal on the grass, close their eyes and we'd throw the pinata off the side of the deck. Lame.
My husband, God bless him, used the rest of the black plastic to block out light under our deck and added the disco ball and laser lights to create an eerie and magical experience. I told you he was a genius!
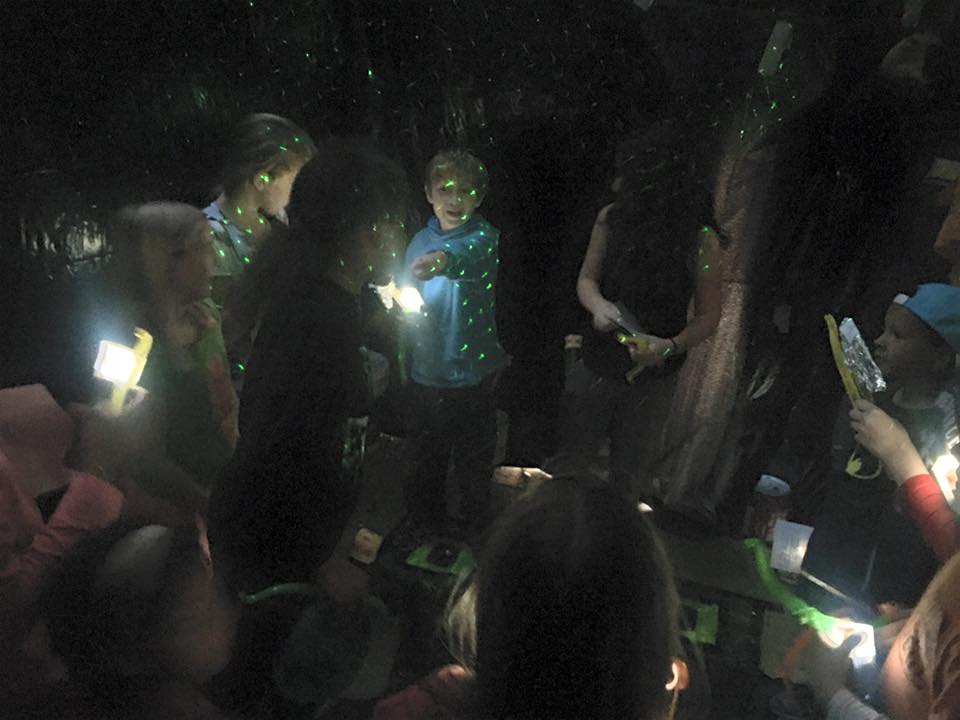
When the kids stepped through the basement door...they were ON the Ender Portal! They stood there for a while because it was so freakin' cool.

Finally, they burst through the split to end their quest! I bought a pinata from Amazon and spray painted it black.
The Ender Dragon!!

As luck would have it, the last kid knocked the candy loose, and the mad scramble began.

Lessons learned:
- Smaller groups work better for a scavenger hunt. We had some young ones, so I kept them all together, but 11 was a bit much.
- If I did this again, I'd break them up into groups of 3 or 4, have them search for the same items, but use different clues and locations and then have them meet up in the end for the final Ender Portal step.
- Provide satchels or bags for them to carry. By the time they had their instruction sheet, pickaxe, torch and bow and arrow, their hands were full.
- The bags could also double as a candy and goodie-bag holder (for bookmarks, candy cave spiders, t-shirts, etc.)
- Test everything first. We experimented with the bow and arrows, how we'd hang the Enderman and Blaze on a string (initially with hooks, but shooting one off knocked them ALL off).
- Start early and recruit help because everything will take more time than you can ever imagine.
This party was a HUGE success! It took way more planning and time to prep than I predicted and was a true labor of love. But everyone had a great time, and given enough wine, I'd do it again. :)
Happy mining!